#4 텔레그램 봇 메세지에 버튼 구현하기
목차
Ⅰ 텔레그램 봇 버튼이란?
1. 텔레그램 봇 버튼의 개념과 역할
2. 텔레그램 봇 버튼의 종류
Ⅱ 인라인 버튼 (InlineKeyboardButton) 구현
1. 인라인 버튼의 구조
2. 기본 인라인 버튼 구현
3. 복잡한 인라인 버튼 구현
4. 반복문을 이용한 인라인 버튼 구현
Ⅲ Reply 버튼 (ReplyKeyboardButton) 구현
1. Reply 버튼의 구조
2. 기본 Reply 버튼 구현
3. Reply 버튼의 기능
[Spring] 텔레그램 봇(Telegram Bot) 만들기 #3
#3 텔레그램 봇 메세지 꾸미기 & 이미지 전송목차Ⅰ 텔레그램 봇 메세지 꾸미기1. 텔레그램 봇 메세지 스타일 적용2. 텔레그램 봇 장문 메세지 전송Ⅱ 텔레그램 봇 이미지 전송1. SendPhoto를 이용한
naimjae.tistory.com
지난 포스팅에서 텔레그램 봇의 텍스트 스타일 적용과 이미지 전송 방법에 대해 알아보았습니다.
이번 포스팅에서는 텔레그램 봇 메세지에 버튼을 생성해보도록 하겠습니다.
Ⅰ 텔레그램 봇 버튼이란?
1. 텔레그램 봇 버튼의 개념과 역할
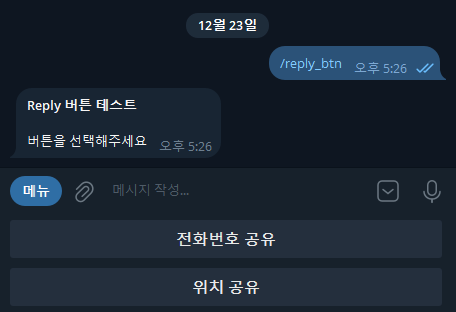
텔레그램 봇을 이용해 메세지만 전달하고 끝내는 것이 아닌 사용자들과 효과적으로 상호작용 하기 위해 버튼을 사용합니다.
버튼의 callback을 이용해 추가적인 작업을 진행하거나, url 링크 이동 등의 작업을 할 수 있습니다.
2. 텔레그램 봇 버튼의 종류
텔레그램 봇의 버튼은 사용하는 목적과 기능에 따라 두 종류의 버튼을 사용할 수 있습니다.
InlineButton
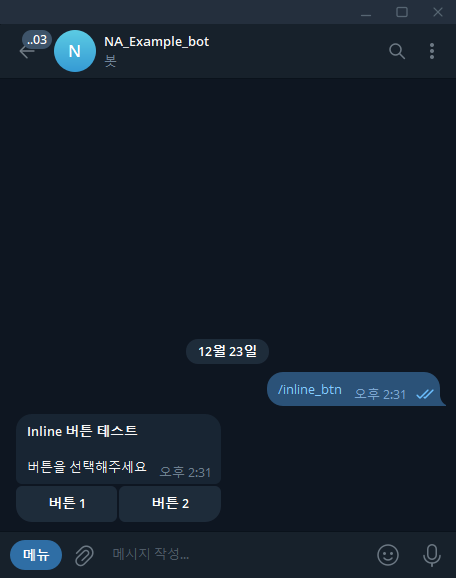
- 메세지 하단에 버튼이 생성되는 구조이며, 메세지와 함께 표시됩니다.
- 버튼 클릭 시, 봇 서버에 데이터를 전송하거나, URL을 통해 외부 웹 페이지로 연결합니다.
- InlineButton은 영구적으로 버튼이 유지됩니다.
- 특정 작업을 실행하거나 외부 링크로 연결할 때 유용합니다.
- 예시1) 외부 웹 페이지 링크 제공 : "Google로 이동"
- 에시2) 설문 조사 응답 처리 : 버튼 클릭 시 Callback 데이터를 서버로 전송
ReplyButton
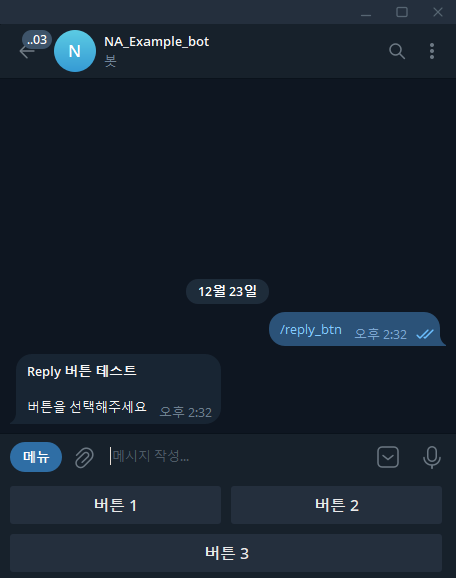
- 메세지와 분리된 키보드 형태로, 사용자의 메세지 입력 창 아래에 생성됩니다.
- 버튼 클릭 시, 해당 버튼의 텍스트가 사용자의 메세지로 전송됩니다.
- ReplyButton은 일회성 버튼으로 생성 가능합니다.
- 사용자가 명령어를 쉽게 선택하거나, 특정 옵션을 입력하도록 유도할 때 사용합니다.
- 예시1) 명령어 선택 : "/Alarm ON" 또는 "/Alarm OFF" 명령어 선택 유도
- 예시2) 메뉴 선택 : "옵션1", "옵션2" 등의 버튼을 쉽게 선택하도록 제공
Ⅱ 인라인 버튼 (InlineKeyboardButton) 구현
1. 인라인 버튼의 구조
기본 설명
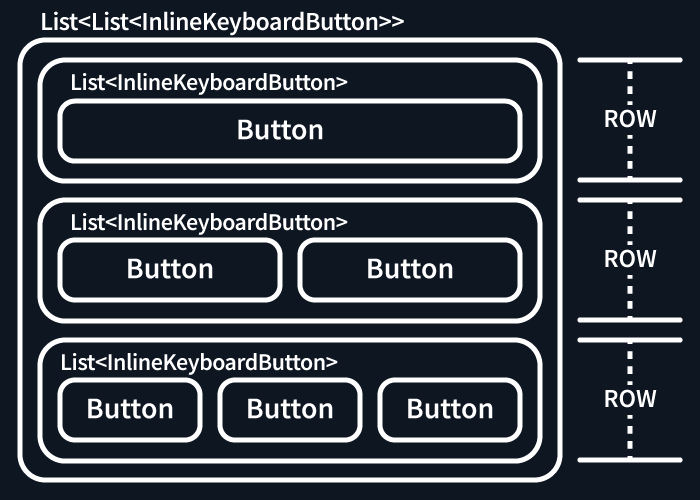
텔레그램 봇의 버튼은 행(Row)과 열(Column)을 가진 테이블 구조를 기반으로합니다.
효과적으로 원하는 버튼을 생성하기 위해서는 버튼이 생성되는 레이아웃 구조를 먼저 이해할 필요가 있습니다.
인라인 버튼은 InlineKeyboardMarkup 객체와 InlineKeyboardButton 객체로 구성되어 있습니다.
InlineKeyboardButton
- 개별 버튼을 생성하고, 동작을 정의하는 객체입니다.
- URL연결이나 Callback 데이터를 설정할 수 있습니다.
InlineKeyboardMarkup
- 텔레그램 메세지에 버튼 키보드를 추가하며, 버튼의 배치를 관리하는 역할을 합니다.
- 이 객체는 이중 리스트 구조(List<List<InlineKeyboardMarkup>>)를 사용하여 버튼을 구현합니다.
- 내부 리스트(List<InlineKeyboardMarkup>) : 하나의 버튼 행을 정의
- 외부 리스트(List<List<InlineKeyboardMarkup>>) : 여러 행을 포함하여 전체 레이아웃을 정의
개별 InlineKeyboardButton 객체는 하나의 버튼이며, 이 버튼들이 모여 하나의 행을 구성합니다.
여러 행이 모여 InlineKeyboardMarkup 객체를 통해 전체 버튼 레이아웃이 생성됩니다.
2. 기본 인라인 버튼 구현
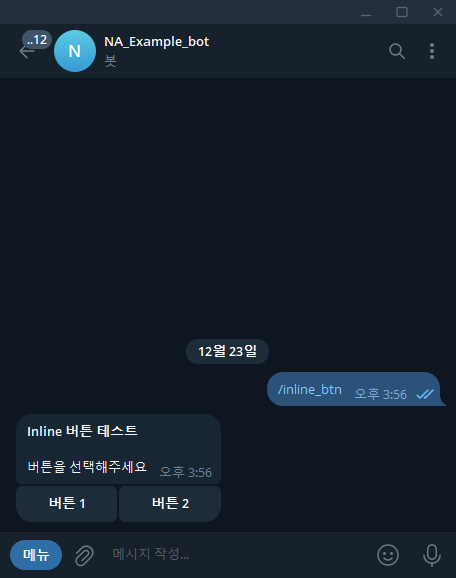
먼저 위 사진과 같은 기본적인 버튼을 만들어보겠습니다.
코드 예시
@Component
public class BotHandler {
    public String commandHandle(Update update) {
        String message = update.getMessage().getText();

        if(message.contains("/hello")) {
            return "안녕하세요. 텔레그램 봇 예제입니다.";

        // "/inline_btn" 명령어 Handler에 등록
        }else if(message.contains("/inline_btn")) {
            List<String> long_text = new ArrayList<>();

            long_text.add("*Inline 버튼 테스트*\n");
            long_text.add("버튼을 선택해주세요");

            return String.join("\n", long_text);
        }else {
            return null;
        }
    }
}
@Override
public void onUpdateReceived(Update update) {
if (update.hasCallbackQuery()) {
System.out.println("받은 콜백 메세지 : " + update.getCallbackQuery().getData());
}else {
System.out.println("받은 메세지 : " + update.getMessage().getText());
}
// commandHandle 메서드를 통한 명령어 처리
String messageText = botHandler.commandHandle(update);
// 메세지 생성
SendMessage message = new SendMessage();
message.setParseMode("Markdown");
message.setChatId(update.getMessage().getChatId());
message.setText(messageText);
// InlineKeyboardMarkup 생성
InlineKeyboardMarkup keyboardMarkup = new InlineKeyboardMarkup();
List<List<InlineKeyboardButton>> rowsInline = new ArrayList<>();
// 버튼이 포함된 행 생성
List<InlineKeyboardButton> row1 = new ArrayList<>();
// 첫 번째 버튼 생성
InlineKeyboardButton exampleButton1 = new InlineKeyboardButton();
exampleButton1.setText("버튼 1");
exampleButton1.setCallbackData("btn1"); // Callback 데이터 설정
row1.add(exampleButton1); // 행에 버튼을 추가
// 두 번째 버튼 생성
InlineKeyboardButton exampleButton2 = new InlineKeyboardButton();
exampleButton2.setText("버튼 2");
exampleButton2.setUrl("https://www.google.com"); // URL 주소 설정
row1.add(exampleButton2); // 행에 버튼을 추가
// 행을 키보드에 추가
rowsInline.add(row1);
// 키보드 레이아웃 설정
keyboardMarkup.setKeyboard(rowsInline);
message.setReplyMarkup(keyboardMarkup);
// 메세지 전송
try {
execute(message);
} catch (TelegramApiException e) {
System.out.println("Error" + e.getMessage());
}
}
코드 설명
- InlineKeyboardMarkup 객체 생성
- InlineKeyboardMarkup 객체와 List<List<InlineKeyboardButton>>를 먼저 생성합니다.
- InlineKeyboardMarkup는 전체 키보드 레이아웃을 관리하는 역할을 합니다.
- 버튼 행 생성
- List<InlineKeyboardButton>를 생성하여 하나의 버튼 행(Row)을 만듭니다.
- 버튼 행은 여러 버튼으로 구성되며, 하나의 행에는 필요한 만큼의 버튼을 추가할 수 있습니다.
- 버튼 추가
- InlineKeyboardButton 객체를 생성하여 버튼의 이름과 동작을 정의합니다.
- setCallbackData()에 Callback 데이터를 설정합니다.
- setUrl()에 이동할 웹 페이지의 URL을 설정합니다.
- 생성된 버튼을 List<InlineKeyboardButton>에 추가합니다.
- 행을 키보드에 추가
- 버튼이 모두 추가된 List<InlineKeyboardButton>를 List<List<InlineKeyboardButton>>에 추가합니다.
- 키보드 완성
- List<List<InlineKeyboardButton>>를 InlineKeyboardMarkup 객체에 추가하면 버튼 레이아웃이 완성됩니다.
- 메시지에 키보드 추가
- 마지막으로 InlineKeyboardMarkup 객체를 SendMessage 객체에 추가하면, 메시지에 버튼이 포함됩니다.
실행 결과

"버튼 1"을 클릭하면 사전에 정의한 콜백 메세지가 전송됩니다.
"버튼 2"를 클릭하면 사전에 정의한 URL인 구글로 이동하게 됩니다.
3. 복잡한 인라인 버튼 구현
이번에는 여러 행에 걸쳐 복잡한 구조의 인라인 버튼을 구현해보겠습니다.
각 행에 필요한 버튼을 배치하여 다양한 레이아웃을 설정할 수 있습니다.
코드 예시
@Override
public void onUpdateReceived(Update update) {
    // commandHandle 메서드를 통한 명령어 처리
    String messageText = botHandler.commandHandle(update);

    // 메세지 생성
    SendMessage message = new SendMessage();
    message.setParseMode("Markdown");
    message.setChatId(update.getMessage().getChatId());
    message.setText(messageText);

    // InlineKeyboardMarkup 생성
    InlineKeyboardMarkup keyboardMarkup = new InlineKeyboardMarkup();
    List<List<InlineKeyboardButton>> rowsInline = new ArrayList<>();

    // 버튼이 포함된 행 생성
    List<InlineKeyboardButton> row1 = new ArrayList<>();
    List<InlineKeyboardButton> row2 = new ArrayList<>();
    List<InlineKeyboardButton> row3 = new ArrayList<>();

    // 첫 번째 행 버튼 생성
    InlineKeyboardButton exampleButton1 = new InlineKeyboardButton();
    exampleButton1.setText("버튼 1");
    exampleButton1.setCallbackData("btn1");
    row1.add(exampleButton1); // 첫 번째 행에 버튼을 추가

    // 두 번째 행 버튼 생성
    InlineKeyboardButton exampleButton2 = new InlineKeyboardButton();
    exampleButton2.setText("버튼 2");
    exampleButton2.setCallbackData("btn2");
    row2.add(exampleButton2); // 두 번째 행에 버튼을 추가

    InlineKeyboardButton exampleButton3 = new InlineKeyboardButton();
    exampleButton3.setText("버튼 3");
    exampleButton3.setCallbackData("btn3");
    row2.add(exampleButton3); // 두 번째 행에 버튼을 추가

    // 세 번째 행 버튼 생성
    InlineKeyboardButton exampleButton4 = new InlineKeyboardButton();
    exampleButton4.setText("버튼 4");
    exampleButton4.setCallbackData("btn4");
    row3.add(exampleButton4); // 세 번째 행에 버튼을 추가

    InlineKeyboardButton exampleButton5 = new InlineKeyboardButton();
    exampleButton5.setText("버튼 5");
    exampleButton5.setCallbackData("btn5");
    row3.add(exampleButton5); // 세 번째 행에 버튼을 추가

    InlineKeyboardButton exampleButton6 = new InlineKeyboardButton();
    exampleButton6.setText("버튼 6");
    exampleButton6.setCallbackData("btn6");
    row3.add(exampleButton6); // 세 번째 행에 버튼을 추가

    // 행을 키보드에 추가
    rowsInline.add(row1);
    rowsInline.add(row2);
    rowsInline.add(row3);

    // 키보드 레이아웃 설정
    keyboardMarkup.setKeyboard(rowsInline);
    message.setReplyMarkup(keyboardMarkup);

    // 메세지 전송
    try {
        execute(message);
    } catch (TelegramApiException e) {
        System.out.println("Error" + e.getMessage());
    }
}
실행 결과
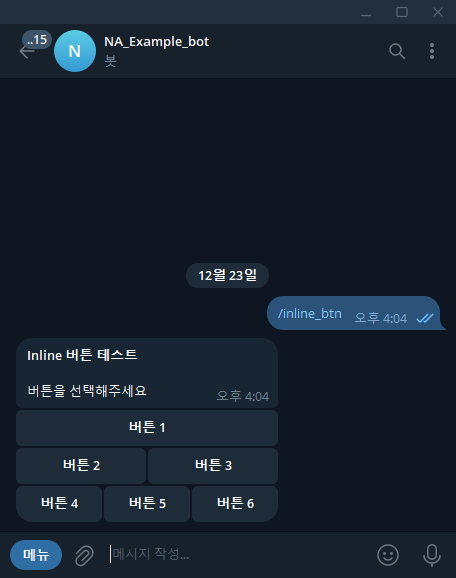
코드 설명
필요한 행 개수에 맞게 List<InlineKeyboardButton>를 생성 합니다.
각 행에 필요한 버튼을 개수에 맞게 추가해주면 복잡한 구조의 버튼을 구현할 수 있습니다.
4. 반복문을 이용한 인라인 버튼 구현
위에서 복잡한 구조의 인라인 버튼을 만들어 보았습니다.
하지만 개별적으로 행과 버튼을 하나씩 추가하는 방식은 코드가 길어지고, 가독성이 떨어지게 됩니다.
이번에는 반복문과 조건문을 이용해 효율적으로 인라인 버튼의 레이아웃을 만들어보겠습니다.
이 방법을 통해 반복적인 작업을 줄이고, 다양한 조건을 활용하여 원하는 버튼 레이아웃을 생성할 수 있습니다.
코드 예시
@Override
public void onUpdateReceived(Update update) {
    // commandHandle 메서드를 통한 명령어 처리
    String messageText = botHandler.commandHandle(update);

    // 메세지 생성
    SendMessage message = new SendMessage();
    message.setParseMode("Markdown");
    message.setChatId(update.getMessage().getChatId());
    message.setText(messageText);

    // InlineKeyboardMarkup 생성
    InlineKeyboardMarkup keyboardMarkup = new InlineKeyboardMarkup();
    List<List<InlineKeyboardButton>> rowsInline = new ArrayList<>();

    // 버튼이 포함된 행 생성
    List<InlineKeyboardButton> row = new ArrayList<>();
    int buttonIndex = 0;  // 버튼 번호를 추적
    int buttonsInRow = 1; // 첫 번째 행은 1개 버튼으로 시작

    for (int i=0; i<6; i++) {
        InlineKeyboardButton exampleButton = new InlineKeyboardButton();
        exampleButton.setText("버튼 " + (i+1));
        exampleButton.setCallbackData("btn" + (i+1));
        row.add(exampleButton);
        buttonIndex++;

        if (buttonIndex == buttonsInRow) {
            rowsInline.add(row);     // 현재 행을 추가
            row = new ArrayList<>(); // 새 행 초기화
            buttonIndex = 0;         // 버튼 번호 리셋
            buttonsInRow++;          // 다음 행에는 버튼 하나 추가
        }
    }

    // 행을 키보드에 추가
    rowsInline.add(row);

    // 키보드 레이아웃 설정
    keyboardMarkup.setKeyboard(rowsInline);
    message.setReplyMarkup(keyboardMarkup);

    // 메세지 전송
    try {
        execute(message);
    } catch (TelegramApiException e) {
        System.out.println("Error" + e.getMessage());
    }
}
위 코드와 같이 반복문과 조건을 통해 조금 더 효율적으로 버튼의 레이아웃을 정의할 수 있습니다.
다양한 조건식을 활용해 원하는 버튼의 레이아웃을 구현해보세요.
// 하나의 행에 2개의 버튼만 구현
for (int i=0; i<6; i++) {
    InlineKeyboardButton exampleButton = new InlineKeyboardButton();
    exampleButton.setText("버튼 " + (i+1));
    exampleButton.setCallbackData("btn" + (i+1));
    row.add(exampleButton);

    if (row.size() == 2) {
        rowsInline.add(row);
        row = new ArrayList<>();
    }
}
Ⅲ Reply 버튼 (ReplyKeyboardMarkup) 구현
1. Reply 버튼의 구조
기본 설명
Reply 버튼은 인라인 버튼과 유사하지만 조금씩 다른 부분이 있습니다.
Reply 버튼 역시 행과 열을 가진 테이블 구조를 기반으로 하지만 사용하는 객체에서 차이를 보입니다.
KeyboardButton
- 개별 버튼을 생성하고, 동작을 정의하는 객체입니다.
- 텍스트 입력 유도, 전화번호 요청, 위치 정보 요청 등의 기능을 설정할 수 있습니다.
KeyboardRow
- 버튼들이 모여있는 하나의 행을 정의하는 객체입니다.
- 각 행에는 하나 이상의 버튼을 추가할 수 있습니다.
ReplyKeyboardMarkup
- 텔레그램 메세지에 버튼 키보드를 추가하며, 버튼의 배치를 관리하는 역할을 합니다.
- 키보드의 크기 조정, 버튼 일회성 여부 등의 동작을 설정할 수 있습니다.
2. 기본 Reply 버튼 구현
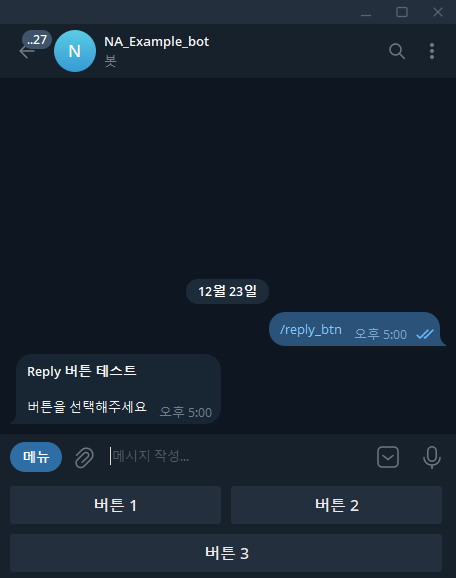
먼저 위 사진과 같은 기본적인 버튼을 만들어 보겠습니다.
코드 예시
@Component
public class BotHandler {
    public String commandHandle(Update update) {
        String message = update.getMessage().getText();

        if(message.contains("/hello")) {
            return "안녕하세요. 텔레그램 봇 예제입니다.";

        // "/reply_btn" 명령어 Handler에 등록
        }else if(message.contains("/reply_btn")) {
            List<String> long_text = new ArrayList<>();

            long_text.add("*Reply 버튼 테스트*\n");
            long_text.add("버튼을 선택해주세요");

            return String.join("\n", long_text);
        }else {
            return null;
        }
    }
}
@Override
public void onUpdateReceived(Update update) {
System.out.println("받은 메세지 : " + update.getMessage().getText());
// commandHandle 메서드를 통한 명령어 처리
String messageText = botHandler.commandHandle(update);
// 메세지 생성
SendMessage message = new SendMessage();
message.setParseMode("Markdown");
message.setChatId(update.getMessage().getChatId());
message.setText(messageText);
// ReplyKeyboardMarkup 생성
ReplyKeyboardMarkup KeyboardMarkup = new ReplyKeyboardMarkup();
KeyboardMarkup.setResizeKeyboard(true); // 키보드 크기 자동 조정
KeyboardMarkup.setOneTimeKeyboard(true); // 키보드 자동 숨김
List<KeyboardRow> keyboard = new ArrayList<>();
// 첫 번째 행 생성
KeyboardRow row1 = new KeyboardRow();
KeyboardButton exampleButton1 = new KeyboardButton();
exampleButton1.setText("버튼 1");
row1.add(exampleButton1);
KeyboardButton exampleButton2 = new KeyboardButton();
exampleButton2.setText("버튼 2");
row1.add(exampleButton2);
// 두 번째 행 생성
KeyboardRow row2 = new KeyboardRow();
row2.add(new KeyboardButton("버튼 3"));
// 키보드에 행 추가
keyboard.add(row1);
keyboard.add(row2);
// 키보드 설정
KeyboardMarkup.setKeyboard(keyboard);
message.setReplyMarkup(KeyboardMarkup);
// 메세지 전송
try {
execute(message);
} catch (TelegramApiException e) {
System.out.println("Error" + e.getMessage());
}
}
코드 설명
- ReplyKeyboardMarkup 객체 생성
- ReplyKeyboardMarkup는 전체 키보드 레이아웃을 관리하는 역할을 합니다.
- 주요 설정
- setResizeKeyboard(true) : 키보드 크기 자동 조정
- setOneTimeKeyboard(true) : 키보드 자동 숨김
- List<KeyboardRow> 객체 생성
- 버튼 행들을 저장할 리스트를 생성합니다.
- 버튼 행 생성
- KeyboardRow 객체를 생성하여 하나의 버튼 행(Row)를 만듭니다.
- 버튼 행은 여러 버튼으로 구성되며, 하나의 행에는 필요한 만큼의 버튼을 추가할 수 있습니다.
- 버튼 추가
- KeyboardButton 객체를 생성하여 버튼의 이름과 동작을 정의합니다.
- 주요 기능
- setText() : 버튼의 이름을 설정 / New KeyboardButton("이름")으로 객체 생성과 동시에 이름을 설정 가능
- setRequestContact(true) : 전화번호 요청 활성화
- setRequestLocation(true) : 위치 요청 활성화
- 행을 키보드에 추가
- 생성된 KeyboardRow를 List<KeyboardRow>에 추가합니다.
- 키보드 완성
- ReplyKeyboardMarkup 객체에 List<KeyboardRow>를 추가하면 버튼 레이아웃이 완성됩니다.
- 메세지에 키보드 추가
- ReplyKeyboardMarkup 객체를 SendMessage 객체에 추가하면, 메세지에 버튼이 등록됩니다.
실행 결과
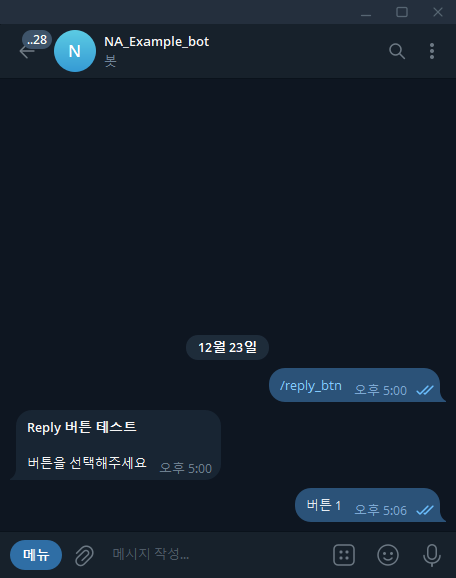
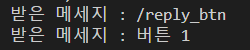
Reply 버튼을 클릭하게 되면 클릭한 버튼의 이름이 메세지로 전송됩니다.
3. Reply 버튼의 기능
setRequestContact(true) - 사용자 전화번호 요청 활성화
keyboardButton 객체의 setRequestContact 옵션을 이용해 사용자의 전화번호를 가져올 수 있습니다.
@Override
public void onUpdateReceived(Update update) {
    // 콘솔 출력
    if (update.hasMessage() && update.getMessage().hasContact()) {
        String phoneNumber = update.getMessage().getContact().getPhoneNumber();
        System.out.println("공유된 전화번호: " + phoneNumber);

    }else {
        System.out.println("받은 메세지 : " + update.getMessage().getText());
    }

    // commandHandle 메서드를 통한 명령어 처리
    String messageText = botHandler.commandHandle(update);

    ... 생략 ...

    KeyboardRow row1 = new KeyboardRow();

    KeyboardButton exampleButton1 = new KeyboardButton();
    exampleButton1.setText("전화번호 공유");
    exampleButton1.setRequestContact(true); // 전화번호 요청 활성화
    row1.add(exampleButton1);

    ... 생략 ...
}
실행 결과


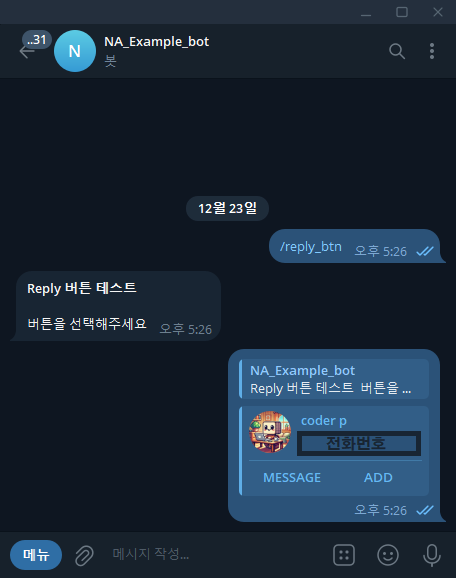

SetRequestLocation(true) - 사용자 위치 요청 활성화
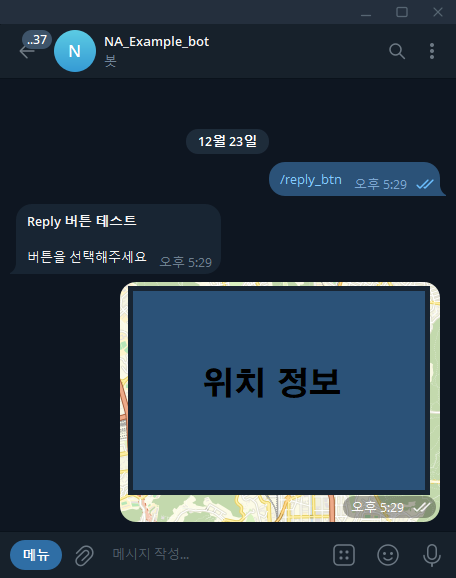
keyboardButton 객체의 SetRequestLocation 옵션을 이용해 사용자의 전화번호를 가져올 수 있습니다.
@Override
public void onUpdateReceived(Update update) {
    // 콘솔 출력
    if (update.hasMessage() && update.getMessage().hasLocation()) {
        double latitude = update.getMessage().getLocation().getLatitude();
        double longitude = update.getMessage().getLocation().getLongitude();
        System.out.println("공유된 위치: 위도(" + latitude + "), 경도(" + longitude + ")");

    }else {
        System.out.println("받은 메세지 : " + update.getMessage().getText());
    }

    // commandHandle 메서드를 통한 명령어 처리
    String messageText = botHandler.commandHandle(update);

    ... 생략 ...

    KeyboardRow row2 = new KeyboardRow();

    KeyboardButton exampleButton2 = new KeyboardButton();
    exampleButton2.setText("위치 공유");
    exampleButton2.setRequestLocation(true); // 위치 요청 활성화
    row2.add(exampleButton2);

    ... 생략 ...
}
실행 결과


지금까지 텔레그램 봇 메세지에 다양한 버튼을 구현해봤습니다.
5편에서는 Spring의 Scheduled를 이용한 자동 메세지 전송을 구현해보겠습니다.😁
'Programming > Spring' 카테고리의 다른 글
| [Spring] 텔레그램 봇(Telegram Bot) 만들기 #5 - Scheduled 반복 작업 구현 (0) | 2024.12.24 |
|---|---|
| [Spring] 텔레그램 봇(Telegram Bot) 만들기 #3 - 메세지 꾸미기 & 이미지 전송 (1) | 2024.12.19 |
| [Spring] 텔레그램 봇(Telegram Bot) 만들기 #2 - 명령어 처리 & 메세지 발송 (1) | 2024.12.19 |
| [Spring] 텔레그램 봇(Telegram Bot) 만들기 #1 - 텔레그램 봇 생성 (0) | 2024.12.19 |


